rhce-08 第19-20题

rhce-08 第19-20题

题目列表

19.配置 iscsI 服务端

20.配置 iscsI 的客户端

19.配置 iscsI 服务端

配置system1提供一个iSCSI服务磁盘名为iqn.2017-02.com.example:system1,并符合下列要求:

1)服务端口为3260。

2)使用iscsi_store作为其后端卷,其大小为3G。

3)此服务只能被system2访问。

安装工具,防火墙放行相应端口,查看空闲磁盘。

1
2
3
4
5
6
[root@localhost ~]# yum install targetcli -y
[root@localhost ~]# systemctl restart target
[root@localhost ~]# systemctl enable target
[root@localhost ~]# firewall-cmd --permanent --add-port=3260/tcp
[root@localhost ~]# firewall-cmd --reload
[root@localhost ~]# fdisk -l

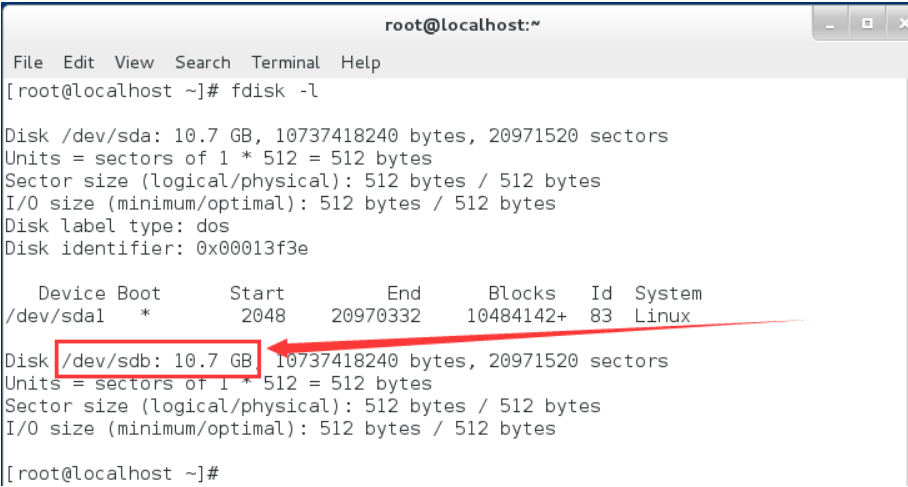
如上图,sdb空闲,可以讲iscsi服务搭在这个磁盘。

新建磁盘分区

1
2
3
4
5
6
7
8
9
10
11
12
13
14
15
16
17
18
19
20
21
22
23
24
25
26
27
28
29
30
31
32
33
34
35
36
37
38
39
40
41
42
43
44
45
46
47
48
49
50
51
52
53
54
55
56
57
58
59
60
61
[root@localhost ~]# fdisk /dev/sdb
Welcome to fdisk (util-linux 2.23.2).

Changes will remain in memory only, until you decide to write them.
Be careful before using the write command.

Device does not contain a recognized partition table
Building a new DOS disklabel with disk identifier 0x85651593.

Command (m for help): n
Partition type:
p primary (0 primary, 0 extended, 4 free)
e extended
Select (default p): p
Partition number (1-4, default 1): #直接回车
First sector (2048-20971519, default 2048): #直接回车
Using default value 2048
Last sector, +sectors or +size{K,M,G} (2048-20971519, default 20971519): +3100M
#这里写3100M而不是3G,因为必须多出来一些空间以作他用
Partition 1 of type Linux and of size 3 GiB is set

Command (m for help): t #指定类型type
Selected partition 1
Hex code (type L to list all codes): L #用L表示list列出所有类型,下面8e就是LVM类型

0 Empty 24 NEC DOS 81 Minix / old Lin bf Solaris
1 FAT12 27 Hidden NTFS Win 82 Linux swap / So c1 DRDOS/sec (FAT-
2 XENIX root 39 Plan 9 83 Linux c4 DRDOS/sec (FAT-
3 XENIX usr 3c PartitionMagic 84 OS/2 hidden C: c6 DRDOS/sec (FAT-
4 FAT16 <32M 40 Venix 80286 85 Linux extended c7 Syrinx
5 Extended 41 PPC PReP Boot 86 NTFS volume set da Non-FS data
6 FAT16 42 SFS 87 NTFS volume set db CP/M / CTOS / .
7 HPFS/NTFS/exFAT 4d QNX4.x 88 Linux plaintext de Dell Utility
8 AIX 4e QNX4.x 2nd part 8e Linux LVM df BootIt
9 AIX bootable 4f QNX4.x 3rd part 93 Amoeba e1 DOS access
a OS/2 Boot Manag 50 OnTrack DM 94 Amoeba BBT e3 DOS R/O
b W95 FAT32 51 OnTrack DM6 Aux 9f BSD/OS e4 SpeedStor
c W95 FAT32 (LBA) 52 CP/M a0 IBM Thinkpad hi eb BeOS fs
e W95 FAT16 (LBA) 53 OnTrack DM6 Aux a5 FreeBSD ee GPT
f W95 Ext'd (LBA) 54 OnTrackDM6 a6 OpenBSD ef EFI (FAT-12/16/
10 OPUS 55 EZ-Drive a7 NeXTSTEP f0 Linux/PA-RISC b
11 Hidden FAT12 56 Golden Bow a8 Darwin UFS f1 SpeedStor
12 Compaq diagnost 5c Priam Edisk a9 NetBSD f4 SpeedStor
14 Hidden FAT16 <3 61 SpeedStor ab Darwin boot f2 DOS secondary
16 Hidden FAT16 63 GNU HURD or Sys af HFS / HFS+ fb VMware VMFS
17 Hidden HPFS/NTF 64 Novell Netware b7 BSDI fs fc VMware VMKCORE
18 AST SmartSleep 65 Novell Netware b8 BSDI swap fd Linux raid auto
1b Hidden W95 FAT3 70 DiskSecure Mult bb Boot Wizard hid fe LANstep
1c Hidden W95 FAT3 75 PC/IX be Solaris boot ff BBT
1e Hidden W95 FAT1 80 Old Minix
Hex code (type L to list all codes): 8e #选择8e即可
Changed type of partition 'Linux' to 'Linux LVM'

Command (m for help): w #write写入保存
The partition table has been altered!

Calling ioctl() to re-read partition table.
Syncing disks.
[root@localhost ~]#
[root@localhost ~]# partprobe
[root@localhost ~]# fdisk -l

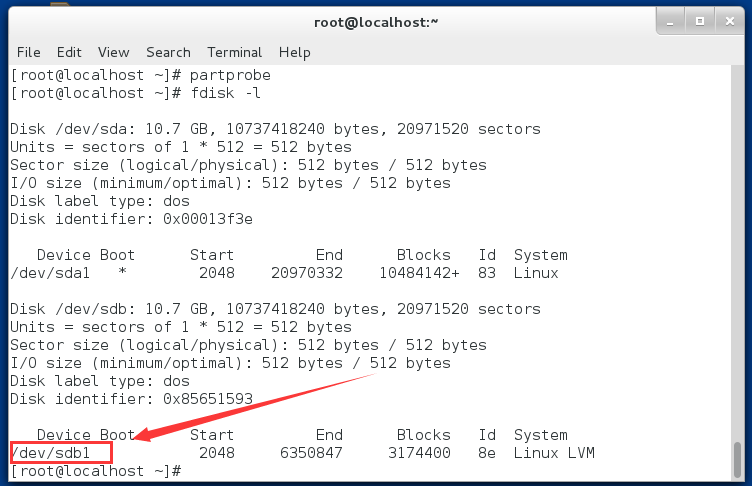
如下图,多出来一个sdb1分区。

创建逻辑卷iscsi_store作为后端存储

1
2
3
4
5
6
7
[root@localhost ~]# pvcreate /dev/sdb1
Physical volume "/dev/sdb1" successfully created
[root@localhost ~]# vgcreate myvg /dev/sdb1
Volume group "myvg" successfully created
[root@localhost ~]# lvcreate -n iscsi_store -L +3G myvg
Logical volume "iscsi_store" created
[root@localhost ~]#

接下来到system2上,cat出iscsi的iqn,下面要用

1
2
3
4
5
6
[root@localhost ~]# cat /etc/iscsi/initiatorname.iscsi 
InitiatorName=iqn.1994-05.com.redhat:9e96ff23da37
[root@localhost ~]#

#复制上述iqn:
iqn.1994-05.com.redhat:9e96ff23da37

回到system1,开始配置iscsi服务端:

1
2
3
4
5
6
7
8
9
10
11
12
13
14
15
16
17
18
[root@localhost ~]# targetcli
/> ls
o- / ..................................................................... [...]
o- backstores .......................................................... [...]
| o- block .............................................. [Storage Objects: 0]
| o- fileio ............................................. [Storage Objects: 0]
| o- pscsi .............................................. [Storage Objects: 0]
| o- ramdisk ............................................ [Storage Objects: 0]
o- iscsi ........................................................ [Targets: 0]
o- loopback ..................................................... [Targets: 0]
/> /backstores/block create iscsi_store /dev/myvg/iscsi_store
/> /iscsi create iqn.2017-02.com.example:system1 #这是题目里面要求配置的iqn
/> /iscsi/iqn.2017-02.com.example:system1/tpg1/luns create /backstores/block/iscsi_store
/> iscsi/iqn.2017-02.com.example:system1/tpg1/portals delete ip_address=0.0.0.0 ip_port=3260 #这个命令会报错是正常的,它只是为了确保3260端口不被占用
/> /iscsi/iqn.2017-02.com.example:system1/tpg1/portals create 172.25.0.11
/> /iscsi/iqn.2017-02.com.example:system1/tpg1/acls create iqn.1994-05.com.redhat:9e96ff23da37 #这个iqn就是上面特意到system2上cat出来的iqn。
/> exit
[root@localhost ~]# systemctl restart target

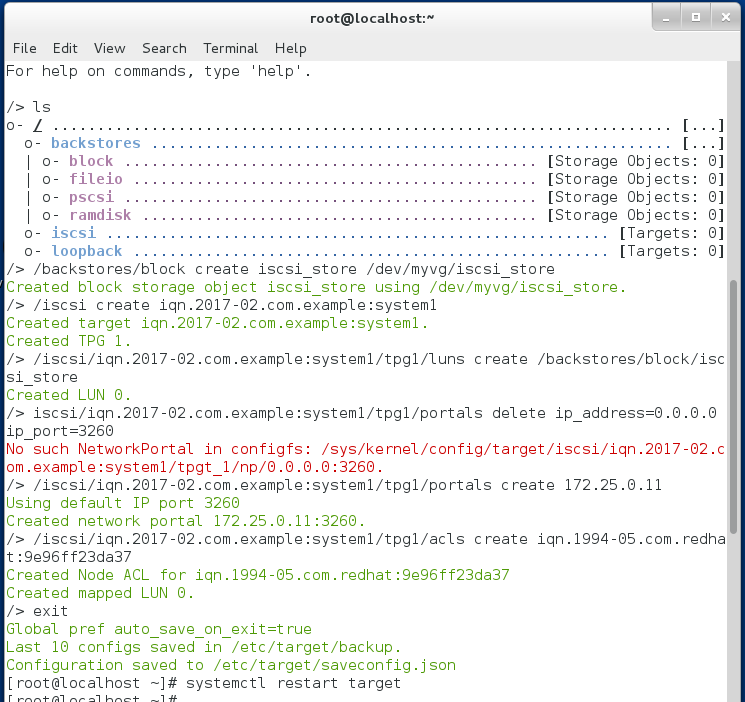
实际配置时,有字体颜色区别,如下图:

20.配置 iscsI 的客户端

配置system2使其能连接在system1上提供的iqn.2017-02.com.example:system1并符合以下要求:

1)iSCSI设备在系统启动的时候自动加载。

2)块设备iSCSI上包含一个大小为2100 MiB的分区,并格式化为xfs。

3)此分区挂载在/mnt/data上同时在系统启动的期间自动挂载。

在system2上完成以下配置:

1
2
3
4
5
6
7
8
9
10
11
12
13
14
[root@localhost ~]# yum install iscsi-initiator-utils -y
[root@localhost ~]# systemctl enable iscsi iscsid
[root@localhost ~]# systemctl restart iscsi iscsid
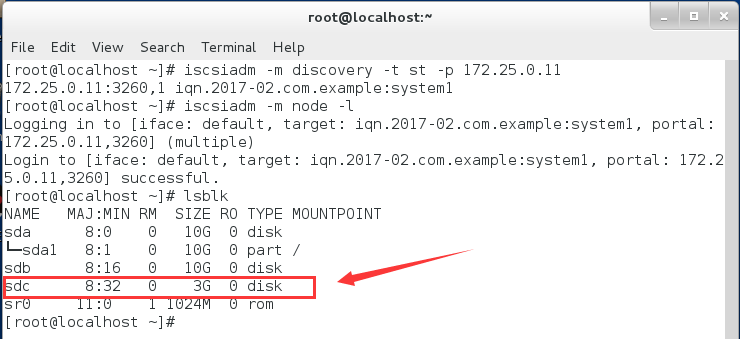
[root@localhost ~]# iscsiadm -m discovery -t st -p 172.25.0.11
172.25.0.11:3260,1 iqn.2017-02.com.example:system1
[root@localhost ~]# iscsiadm -m node -l
[root@localhost ~]# lsblk
NAME MAJ:MIN RM SIZE RO TYPE MOUNTPOINT
sda 8:0 0 10G 0 disk
└─sda1 8:1 0 10G 0 part /
sdb 8:16 0 10G 0 disk
sdc 8:32 0 3G 0 disk
sr0 11:0 1 1024M 0 rom
[root@localhost ~]#

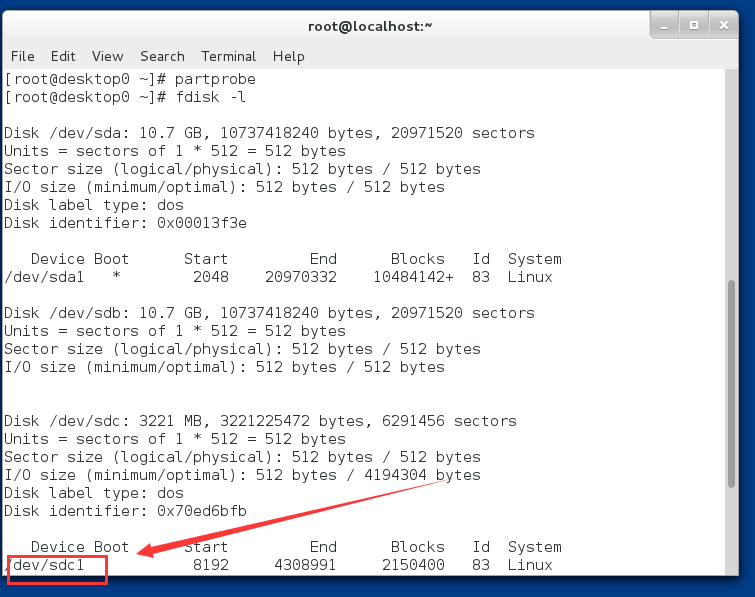
如下图, system2上多出来一个大小为3G的磁盘sdc,就说明登录成功了
对sdc磁盘分区

1
2
3
4
5
6
7
8
9
10
11
12
13
14
15
16
17
18
19
20
[root@desktop0 ~]# fdisk /dev/sdc

Command (m for help): n
Partition type:
p primary (0 primary, 0 extended, 4 free)
e extended
Select (default p): p
Partition number (1-4, default 1): #直接回车
First sector (8192-6291455, default 8192): #直接回车
Using default value 8192
Last sector, +sectors or +size{K,M,G} (8192-6291455, default 6291455): +2100M
Partition 1 of type Linux and of size 2.1 GiB is set

Command (m for help): w
The partition table has been altered!

Calling ioctl() to re-read partition table.
Syncing disks.
[root@desktop0 ~]# partprobe
[root@desktop0 ~]# fdisk -l

将分区sdc1格式化为xfs

1
2
3
4
5
6
7
8
9
10
11
[root@desktop0 ~]# mkfs.xfs /dev/sdc1
meta-data=/dev/sdc1 isize=256 agcount=8, agsize=67200 blks
= sectsz=512 attr=2, projid32bit=1
= crc=0
data = bsize=4096 blocks=537600, imaxpct=25
= sunit=0 swidth=0 blks
naming =version 2 bsize=4096 ascii-ci=0 ftype=0
log =internal log bsize=4096 blocks=2560, version=2
= sectsz=512 sunit=0 blks, lazy-count=1
realtime =none extsz=4096 blocks=0, rtextents=0
[root@desktop0 ~]#

配置开机自动挂载

1
2
3
4
5
6
7
8
9
10
11
[root@desktop0 ~]# mkdir /mnt/data
[root@desktop0 ~]# blkid /dev/sdc1
/dev/sdc1: UUID="ace30a49-85ef-4e65-86ac-9a8e96665d95" TYPE="xfs"
#将此UUID复制下来,添加到/etc/fstab文件里面


[root@desktop0 ~]# vim /etc/fstab
[root@desktop0 ~]# cat /etc/fstab | tail -n 2
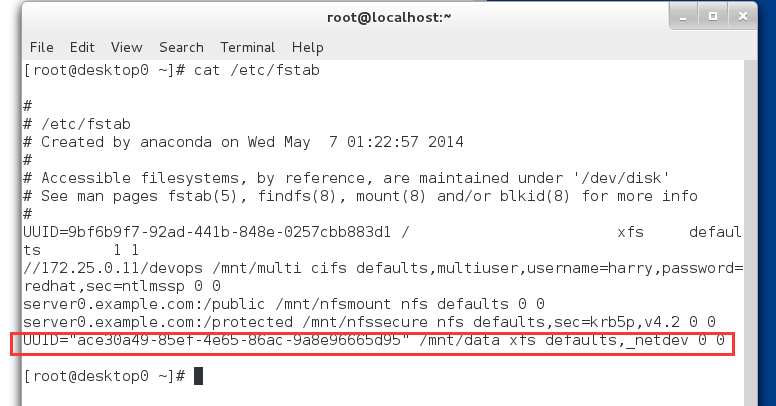
UUID="ace30a49-85ef-4e65-86ac-9a8e96665d95" /mnt/data xfs defaults,_netdev 0 0

[root@desktop0 ~]#

挂载,查看结果

1
2
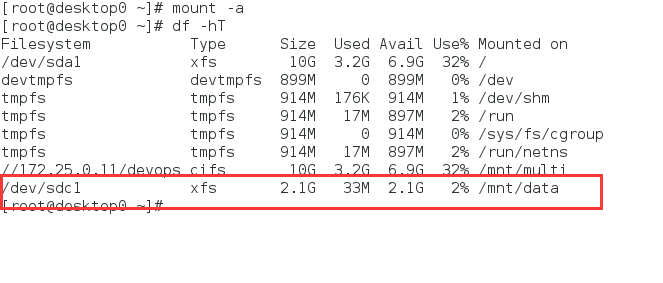
[root@desktop0 ~]# mount -a
[root@desktop0 ~]# df -hT

如下图,可以看到挂载成功。

扩展知识

1
2
3
4
5
6
lvextend和lvcreate的参数:
-l|--extents LogicalExtentsNumber[%{VG|FREE|ORIGIN}]
-L|--size LogicalVolumeSize[bBsSkKmMgGtTpPeE]}

l:指定物理扩展单元数量(无单位)
L:指定逻辑卷大小(有单位M)
欢迎打赏,谢谢
------ 本文结束------
0%